Basic emt skills manual
SOUTHWEST TENNESSEE
COMMUNITY COLLEGE
DEPARTMENT
EMERGENCY MEDICAL SCIENCES
H. WAID RAY
SKILLS MANUAL
17th Edition
Caring for the sick and injured has always been a demanding and oftentimes precarious profession. Early prehospital care in Tennessee usually consisted of funeral homes placing a sick or injured person in the back of a hearse and driving at a breakneck speed to the closest hospital. Fortunately, patients today receive far better professional care from highly-trained, highly-skilled providers. The goal of this manual is to provide you with the psychomotor skills and attendant facts necessary to save lives, reduce morbidity and give the "far better professional care" mentioned above. This manual is not a magic lantern illuminating the correct methodology for managing each and every illness or injury. Rather it is a suggested method of performing skills that, when mastered, provide the foundation for becoming a competent prehospital care provider. Always remember that the psychomotor skills described in this manual are useless without a sound and broad fund of basic knowledge from which to draw. Significant recognition must be given to the National Registry of Emergency Medical Technicians (NREMT) whose original skills sheets this manual is based upon. H. Waid Ray
Basic EMT Skills Manual
H. Waid Ray, 17th Edition
Basic EMT Skills Manual
H. Waid Ray, 17th Edition
Basic EMT Skills Manual
H. Waid Ray, 17th Edition
Description:
• Oxygen is the most important emergency drug and is required by the body to
facilitate the breakdown of glucose into usable forms of energy. Oxygen is odorless, colorless, and tasteless.
• Administration increases arterial oxygen tension which increases the oxygen
saturation available for hemoglobin.
Indications:
• Respiratory emergencies.
• Cardiac arrest.
Contraindications:
• NONE in the emergency setting.
Precautions:
• Patients with COPD may experience apnea. These patient's chemo-receptors
no longer influence breathing as they have converted to an oxygen-based (hypoxic) drive to breathe.
• Do not withhold oxygen from any patient who truly needs it.
• Prolonged administration of high flow oxygen to newborn infants can result in eye
• Cardiac Arrest – as close as possible to 100% FiO2 (BVM),
NOT TO EXCEED
99% SaO2.
• Hypoxia – as close as possible to 100% FiO2 (BVM or 15 LPM / NRB),
NOT TO
EXCEED 99% SaO2.
• Chest Pain – as close as possible to 100 % FiO2 (15 LPM / NRB),
NOT TO
EXCEED 99% SaO2.
1. For severe respiratory distress, 100% FiO2 or as close as possible (15
LPM / NRB),
NOT TO EXCEED 99% SaO2 while closely monitoring
respiratory rate and depth.
2. For normal or minimal respiratory distress, 2-6 LPM via BNC IF patient
cannot tolerate a NRB mask,
NOT TO EXCEED 99% SaO2 while closely
monitoring respiratory rate and depth.
• In all instances, be prepared to ventilate and intubate with a double lumen
Page 1 of 73
Basic EMT Skills Manual
H. Waid Ray, 17th Edition
Instructions to the Candidate: Oxygen Tank Set-Up and
This station is designed to test your ability to correctly assemble the equipment needed to administer supplemental oxygen in the pre-hospital setting. This is an isolated skills test. You will be required to assemble an oxygen tank and a regulator and administer oxygen to a patient using a non-rebreather mask. At this point you will be instructed to discontinue oxygen administration by the non-rebreather mask and start oxygen administration using a nasal cannula because the patient cannot tolerate the mask. Once you have initiated oxygen administration using a nasal cannula, you will be instructed to discontinue oxygen administration completely. You may use only the equipment available in this room. You have five (5) minutes to complete this station. Do you have any questions?
Page 2 of 73
Basic EMT Skills Manual
H. Waid Ray, 17th Edition
Oxygen Tank Set-Up and Administration
Possible Awarded
Take or verbalize standard precautions
Assemble the regulator to the tank
Check tank pressure
Attach non-rebreather mask to oxygen
Prefill reservoir
Adjust liter flow to 12 liters per minute or greater
Apply and adjust the mask to the patient's face
Note: The medical director now orders you to apply a nasal cannula to the patient
Attach nasal cannula to oxygen
Adjust liter flow to six (6) liters per minute or less
Apply nasal cannula to the patient
Note: The medical director now orders you to discontinue oxygen therapy
Remove the nasal cannula from the patient
Shut off the regulator
Relieve the pressure within the regulator
Critical Criteria Did not take, or verbalize, standard precautions Did not assemble the tank and regulator without leaks Did not prefill the reservoir bag Did not adjust the device to the correct liter flow for the non-rebreather mask (12 liters per minute
Did not adjust the device to the correct liter flow for the nasal cannula (6 liters per minute or less) Any other action or inaction causing patient harm or unnecessary pain
Page 3 of 73
Basic EMT Skills Manual
H. Waid Ray, 17th Edition
Instructions to the Candidate: Ventilation Skills – Pocket
This station is designed to test your ability to ventilate a patient with supplemental oxygen using a mouth-to-mask technique. This is an isolated skills test. You may assume that mouth-to-barrier device ventilation is in progress and that the patient has a central pulse. The only patient management required is ventilator support using a mouth-to-mask technique with supplemental oxygen. You must ventilate the patient for at least 30 seconds. You will be evaluated on the appropriateness of ventilatory volumes. You may use any equipment available in this room. You have five (5) minutes to complete this station. Do you have any questions?
Page 4 of 73
Basic EMT Skills Manual
H. Waid Ray, 17th Edition
Ventilation Skills – Pocket Mask
Take or verbalize standard precautions
Connect one-way valve to mask
Open patient's airway or confirm patient's airway is open
(manually or with adjunct) Establishes and maintains a proper mask to face seal
Ventilate the patient at the proper volume and rate
(800-1200 ml per breath/10-20 breaths per minute) Connect the mask to high concentration of oxygen
Adjust flow rate to at least 15 liters per minute
Continue ventilation of the patient at the proper volume and rate
(800-1200 ml per
breath/10-20 breaths per minute)
Note: The examiner must witness ventilations for at least 30 seconds
Critical Criteria
Did not take, or verbalize, standard precautions
Did not adjust liter flow to at least 15 liters per minute
Did not provide proper volume per breath (more than 2 ventilations per
minute were below 800 ml)
Did not ventilate the patient at a rate a 10-20 breaths per minute
Did not allow for complete exhalation
Any other action or inaction causing patient harm or unnecessary pain
Page 5 of 73
Basic EMT Skills Manual
H. Waid Ray, 17th Edition
Instructions to the Candidate: Ventilation Skills – Bag-
Valve-Mask (BVM)
This station is designed to test your ability to ventilate a patient using a bag-valve-mask.
As you enter the station you will find an apneic patient with a palpable central pulse.
There are no bystanders and artificial ventilation has not been initiated. The only patient
management required is airway management and ventilatory support. You must initially
ventilate the patient for a minimum of 30 seconds. You will be evaluated on the
appropriateness of ventilator volumes. I will then inform you that a second rescuer has
arrived and will instruct you that you must control the airway and the mask seal while the
second rescuer provides ventilation. You may use only the equipment available in this
room. You have five (5) minutes to complete this station. Do you have any questions?
General Considerations:
• Gastric distention - Increase inspiratory times to deliver the necessary tidal
volume at low peak inspiratory pressures. If possible, apply cricoid pressure or the Sellick Maneuver (requires additional rescuer) to reduce air inflow to the stomach.
• Low ventilatory volume - Squeeze the bag with your free hand against your leg or
side to expel additional volume. With two rescuers, use two hands to seal the mask to the patient's face and a second rescuer to squeeze the bag with both hands. The two-rescuer technique is preferred. If available, incorporate the use of an automatic transport ventilator to provide adequate tidal volume while sealing mask with both hands. If difficulty exists in providing a leak proof seal to the face, resort to using the mouth-to-mask method.
• Observe for vomitus and be prepared to suction.
• ALWAYS reassess the patient's ABC's, skin color, LOC and record.
Page 6 of 73
Basic EMT Skills Manual
H. Waid Ray, 17th Edition
Ventilation Skills – Bag-Valve-Mask (BVM)
Take or verbalize standard precautions
Verbalize opening the airway
Verbalize inserting an oral airway
Select appropriately sized mask
Create a proper mask-to-face seal
Ventilate patient at no less than 800 ml volume
(The examiner must witness for at least 30 seconds)
Connect reservoir and oxygen
Adjust liter flow to 15 liters/minute or greater
Note:A second EMT arrives to ventilate the patient while you control
the mask and the airway Verbalize re-opening the airway
Creates a proper mask-to-face seal
Instruct assistant to resume ventilation at proper volume per breath
(The examiner must witness for at least 30 seconds)
Critical Criteria
Did not take, or verbalize, standard precautions
Did not immediately ventilate the patient
Interrupted ventilations for more than 20 seconds
Did not provide high concentration of oxygen
Did not provide, or direct assistant to provide, proper volume/breath
(more than two (2) ventilations per minute are below 800 ml)
Did not allow adequate exhalation
Any other action or inaction causing patient harm or unnecessary pain
Page 7 of 73
Basic EMT Skills Manual
H. Waid Ray, 17th Edition
Instructions to the Candidate: Oro/Nasopharyngeal
Airways and Suctioning
This station is designed to test your ability to properly measure, insert and remove oropharyngeal and nasopharyngeal airway adjuncts as well as suction a patient's upper airway. This is an isolated skills test comprised of three separate skills. You may use any equipment available in this room. You have five (5) minutes to complete this station. Do you have any questions?
OROPHARYNGEAL (ORAL) AIRWAY
• An inadequate airway, or
• Patient with loss of consciousness, without a gag reflex, or not breathing, and
• Need for prolonged artificial ventilation.
Contraindications:
• Conscious or semiconscious patient with an intact gag reflex (the adjunct could
cause vomiting or spasm of the vocal cords).
• Inability to introduce the adjunct into the oropharynx secondary to massive
Risk & Complications:
• Stimulation of gag reflex may increase risk of vomiting, aspiration, or
laryngospasm. Be prepared to suction.
• If the chosen adjunct is TOO SHORT, the tip may displace the tongue into
oropharynx obstructing the airway or the adjunct will not advance far enough to lift tongue.
• If the chosen adjunct is TOO LONG, the tip may push the epiglottis over the
glottic opening or induce laryngospasm.
• If the only choice is between an adjunct that is too long and an adjunct that is too
short, choose the adjunct that is TOO LONG. Measure from the corner of the patient's lips to the bottom of the patient's ear lobe or angle of jaw and mark the adjunct. Follow proper insertion techniques to the mark and secure the adjunct to prevent it from advancing further.
NASOPHARYNGEAL (NASAL) AIRWAY
• A conscious patient with an intact gag reflex.
• An inadequate airway due to a relaxed tongue.
• A patient with decreased level of consciousness who cannot tolerate the
oropharyngeal adjunct.
• Trismus, preventing oropharyngeal adjunct insertion.
• Massive trauma to lower jaw, preventing insertion of an oropharyngeal adjunct.
Contraindications:
• Nasopharyngeal adjuncts should not be used in suspected basilar skull fractures
or severe nasal injuries.
Page 8 of 73
Basic EMT Skills Manual
H. Waid Ray, 17th Edition
Risk & Complications:
• Inserting a nasopharyngeal adjunct too far or using a nasopharyngeal adjunct
that is too long may stimulate the gag reflex and may cause vomiting and aspiration or laryngospasm.
• Always have suction prepared prior to insertion.
• If the chosen nasopharyngeal adjunct is TOO SHORT, it may not advance far
enough to create an adequate airway.
• If the chosen nasopharyngeal adjunct is TOO LONG, the tip may push the
epiglottis over the glottic opening or induce laryngospasm
• If the only choice is between a nasopharyngeal adjunct that is too long and a
nasopharyngeal adjunct that is too short, choose the adjunct that is TOO LONG. Measure from the tip of the earlobe to the tip of the nostril and mark the adjunct. Follow proper insertion techniques to the mark and secure the adjunct to prevent the adjunct from advancing further.
• Even if the adjunct is generously lubricated, the nasal passages may still suffer
trauma secondary to insertion. Be prepared for epistaxis (nose bleed).
Page 9 of 73
Basic EMT Skills Manual
H. Waid Ray, 17th Edition
Oro/Nasopharyngeal Airways and Suctioning
Possible Awarded
OROPHARYNGEAL AIRWAY
Take or verbalize standard precautions
Select appropriately sized airway
Insert airway without pushing the tongue posteriorly
Note: The patient is gagging and becoming conscious
Remove the oropharyngeal airway
SUCTIONING
Note: The patient requires suctioning Turn on/prepare suction device
Assure presence of mechanical suction
Insert the suction tip without suction
Apply suction to the oropharynx/nasopharynx
NASOPHARYNGEAL AIRWAY
Note: The patient now requires a nasopharyngeal airway Select appropriately sized airway
Verbalize lubrication of the nasal airway
Fully inserts the airway with the bevel facing toward the septum
Critical Criteria
Did not take, or verbalize, standard precautions
Did not obtain a patent airway with the oropharyngeal airway
Did not obtain a patent airway with the nasopharyngeal airway
Did not demonstrate an acceptable suction technique
Any other action or inaction causing patient harm or unnecessary pain
Page 10 of 73
Basic EMT Skills Manual
H. Waid Ray, 17th Edition
Instructions to the Candidate: Pulse Oximetry
This station is designed to test your ability to correctly apply, monitor and interpret pulse oximetry. This is an isolated skills test. You will be required to correctly apply a pulse oximeter and then verbalize its monitoring and how to interpret the data it provides. You may use only the equipment available in this room. You have five (5) minutes to complete this station. Do you have any questions?
Page 11 of 73
Basic EMT Skills Manual
H. Waid Ray, 17th Edition
Pulse Oximetry
Possible Awarded
Take or verbalize standard precautions
Retrieve pulse oximeter and check batteries
Assess patient's fingernails for polish or false nails and remove if necessary
Verbalize normal values (96 – 100%) and describe treatment: Non rebreather mask at 12-15 LPM or nasal cannula at 4 – 6 LPM if patient cannot tolerate a
mask and based on patient's chief complaint Verbalize mild hypoxia values (91 – 95%) and describe treatment: Immediate need to increase the FiO2; Non rebreather mask at 12 – 15 LPM; consider use
of CPAP if available Verbalize moderate hypoxia values (86 – 90%) and describe treatment: Immediate need to increase the FiO2; consider possible loss of airway patency;
Non rebreather mask at 12 – 15 LPM; consider airway adjunct and bag-valve-mask at 15 LPM; consider use of CPAP if available Verbalize severe hypoxia values (<86%) and describe treatment: assist ventilations with adjunct and bag-valve-mask at 15 LPM; request ALS intercept
if appropriate; consider use of CPAP if available
Critical Criteria Did not take, or verbalize, standard precautions Did not check for nail polish or false nails Did not remove nail polish or false nails if present Did not correctly recite any pulse oximetry values and treatment
Page 12 of 73
Basic EMT Skills Manual
H. Waid Ray, 17th Edition
Table of Autonomic Effects
STRUCTURE OR ACTIVITY
SYMPATHETIC EFFECT
Circulatory System
Rate and Force of Heart Beat
Heart and Skeletal Muscle Vessels
Skin and Visceral Muscle Vessels
Respiratory System
Rate and Depth of Breathing
Digestive System
Digestive Secretions
Renal System
Integumentary System
Pilomotor Muscles
Page 13 of 73
Basic EMT Skills Manual
H. Waid Ray, 17th Edition
Bronchiodilator - Albuterol
(Proventil, Ventolin, Bronkosol, Alupent, Metaprel, etc)
Description:
• A commonly prescribed bronchodilator in pre-hospital care, Albuterol is
administered with either a small volume nebulizer ("nebulizer") or a metered dose inhaler ("MDI").
Actions:
• Albuterol causes bronchodilation with minimal side effects and reduces airway
resistance with approximately five hours duration.
Indications:
• Bronchial asthma or signs and symptoms of respiratory distress.
• Reversible bronchospasm associated with chronic bronchitis and cases of
• Third drug for anaphylaxis.
Contraindications:
• Patients with a known hypersensitivity to Albuterol.
Precautions:
• Palpitations, anxiety, nausea, and dizziness may be seen.
• Monitor vital signs.
• Use caution when administering to patients with a history of cardiovascular
disease or hypertension.
Nebulizer:
Adult: 2.5 mg of the drug placed in 3 ml of normal saline for inhalation and administered by a nebulizer running at the flow rate established in the nebulizer's manufacturer's recommendations until an appropriate mist is achieved (usually about six liters per minute).
Shake the MDI vigorously several times and administer to the patient upon deep inhalation. The patient should hold their breath as long as comfortably possible (at least 10 seconds or more) to assure more effective distribution of the medication.
• Inhalation only.
Page 14 of 73
Basic EMT Skills Manual
H. Waid Ray, 17th Edition
Instructions to the Candidate: Inhaler: Assist with
Patient's Own Device
This station is designed to test your ability to correctly assist a patient in taking their
inhaled medications using a metered dose inhaler (MDI) in the pre-hospital setting. This
is an isolated skills test. You will be required to assemble and administer medications to
a patient using an MDI. Once you have demonstrated your ability to safely administer
MDI medication, you will be instructed to discontinue the therapy completely. You may
use only the equipment available in this room. You have five (5) minutes to complete this
station. Do you have any questions?
Indications:
• Bronchial asthma and/or bronchospasm in emphysema and chronic bronchitis.
Contraindications:
• Usually none.
General Considerations:
• The contents of the MDI are under pressure:
1. Do not puncture. 2. Do not use or store near heat or open flames. 3. Exposure to temperatures above 120 degrees Fahrenheit may cause
4. Never throw container into fire or incinerator.
• When not in use, keep the cap on the MDI's mouthpiece.
• When not in use, store the MDI between 59 degrees and 86 degrees Fahrenheit.
• Failure to use the MDI within the recommended temperature range may result in
improper dosing.
• Infant and Child Considerations:
1. Use of hand held inhalers is very common in children. 2. Retractions are more commonly seen in children than adults. 3. Cyanosis is a late finding in children. 4. In some children, frequent coughing may be present rather than wheezing.
Page 15 of 73
Basic EMT Skills Manual
H. Waid Ray, 17th Edition
Inhaler: Assist with Patient's Own Device
Possible Awarded
Take or verbalize standard precautions
Apply high flow oxygen
Assess vital signs
Determine patient allergies and previous doses
Obtain order to administer medication
Note: The medical director orders you assist the patient with one "puff" of MDI Ventolin
Assemble MDI and extension tube (if available)
Check medication for correct medication, concentration, expiration date, etc.
Instruct patient
Remove high flow oxygen
Allow patient to complete treatment, coaching as necessary
Reapply high flow oxygen
Reassess vital signs and determine subjective improvement
Critical Criteria Did not take, or verbalize, standard precautions Did not check medication Administered incorrect dosage Did not reassess patient Did not reapply high flow oxygen Any other action or inaction causing patient harm or unnecessary pain
Page 16 of 73
Basic EMT Skills Manual
H. Waid Ray, 17th Edition
Instructions to the Candidate: Nebulizer: Assist with
Patient's Own Device
This station is designed to test your ability to correctly assemble the equipment needed
to administer nebulized medications in the pre-hospital setting. This is an isolated skills
test. You will be required to assemble and administer medications to a patient using an
oxygen-driven nebulizer. Once you have demonstrated your ability to safely administer
nebulized medication, you will be instructed to discontinue the therapy completely. You
may use only the equipment available in this room. You have five (5) minutes to
complete this station. Do you have any questions?
Indications:
• Bronchial asthma and/or bronchospasm in emphysema and chronic bronchitis.
Contraindications:
• Usually none.
Page 17 of 73
Basic EMT Skills Manual
H. Waid Ray, 17th Edition
Nebulizer: Assist with Patient's Own Device
Possible Awarded
Take or verbalize standard precautions
Verbalize indications for nebulized therapy in the pre-hospital setting
a. Signs and symptoms of respiratory emergency
b. Bronchospasm due to allergens
Gain medical control permission
Assemble appropriate equipment
a. medication (pre-mix) b. handheld nebulizer with t-piece
c. mouthpiece d. oxygen with tubing
Calmly reassure the patient and explain the procedure to the patient
Determine the correct medication, expiration date, medication clarity and
medication dosage Attach the T-piece, mouth piece and 150mm flextube
Connect the oxygen tubing to the oxygen regulator, set the liter flow to 6 LPM
and connect the other end of the tube to the nebulizer Position the patient in full fowlers for maximum chest expansion
Advise the patient to hold the nebulizer upright and to close his/her lips around
the mouthpiece Encourage the patient to inhale and to hold his/her breath for several seconds
before exhaling Administer half of the medication, then pause and assess the patient's vital
signs for adverse reactions If the vital signs remain essentially unchanged, administer the remaining half of
the medication while continually monitoring the vital signs Return the patient to 12-15 LPM of oxygen via non-rebreathing mask
Transport the patient to the appropriate hospital (if not already enroute)
Continually monitor the patient
Contact Medical Control, advise patient's condition and request further orders
Document the procedure appropriately
Critical Criteria Did not take, or verbalize, standard precautions Did not gain medical control permission Did not determine the correct medication, expiration date, medication clarity and medication
Did not assess vital signs for adverse reactions Any other action or inaction causing patient harm or unnecessary pain
Page 18 of 73
Basic EMT Skills Manual
H. Waid Ray, 17th Edition
Normal Vital Signs
80/46 (+ or - 16 systolic, 16 diastolic)
89/60 (+ or - 24 systolic, 16 diastolic)
96/66 (+ or - 24 systolic, 16 diastolic)
98/64 (+ or - 24 systolic, 16 diastolic)
100/68 (+ or - 24 systolic, 16 diastolic)
99/66 (+ or - 24 systolic, 16 diastolic)
94/56 (+ or - 16 systolic, 16 diastolic)
100/56 (+ or - 16 systolic, 16 diastolic)
106/58 (+ or - 16 systolic, 16 diastolic)
108/58 (+ or - 16 systolic, 16 diastolic)
112/58 (+ or - 18 systolic, 16 diastolic)
114/60 (+ or - 18 systolic, 16 diastolic)
116/60 (+ or - 18 systolic, 16 diastolic)
118/60 (+ or - 18 systolic, 16 diastolic)
130/80 (+ or - 14 systolic, 24 diastolic)
Page 19 of 73
Basic EMT Skills Manual
H. Waid Ray, 17th Edition
Vital Signs and Patient History
Take-Home Assignment
Name:
1) Solicit the assistance of any five cooperative classmates, friends and/or family
2) On each volunteer, assess the
a) pulse including rate and quality; b) respirations including rate and quality; c) auscultated blood pressure; d) skin color, temperature, and moisture; e) pupils; and f) find the following pulses:
i) Carotid, ii) Brachial, iii) Radial, iv) Femoral, v) Posterior tibialis (posterior tib), and vi) Dorsalis pedis (pedal).
3) Record the name, date, time taken, age, sex, race and vital signs of each volunteer
below and be prepared to turn in your findings next class meeting.
Page 20 of 73
Basic EMT Skills Manual
H. Waid Ray, 17th Edition
Patient Assessment Memory Prompts
Isolation
(Standard Precautions)
Scene size-up including SINHS (Safety, Injury/Illness, Number of Patients,
Initial including IRCABCP (Impression, Responsiveness, Complaint,
Airway, Breathing, Circulation, Priority)
Focused/Rapid including HEVIT (History, Exam, Vitals, Interventions,
Detailed assessment
Ongoing including FIV (Focused, Initial, Vitals [repeat each])
Page 21 of 73
Basic EMT Skills Manual
H. Waid Ray, 17th Edition
Instructions to the Candidate: Medical Assessment
This station is designed to test your ability to perform a patient assessment of a patient with a chief complaint of a medical nature and "voice-treat" all conditions discovered. You must conduct your assessment as you would in the field including communicating with your patient. You may remove the patient's clothing down to shorts or swimsuit if you feel it is necessary. As you conduct your assessment, you should state everything you are assessing. Clinical information not obtainable by visual or physical inspection will be given to you after you demonstrate how you would normally gain that information. You may assume that you have two EMTs working with you and that they are correctly carrying out the verbal treatments you indicate. You have (10) minutes to complete this skill station. Do you have any questions?
Page 22 of 73
Basic EMT Skills Manual
H. Waid Ray, 17th Edition
Medical Assessment
Take or verbalize standard precautions
SCENE SIZE-UP Determine the scene is safe
Determine the mechanism of injury/nature of illness
Determine the number of patients
Request additional help if necessary
Consider stabilization of spine
INITIAL ASSESSMENT Verbalize general impression of the patient
Determine responsiveness/level of consciousness
Determine chief complaint/apparent life threats
Assess airway and breathing
Initiate appropriate oxygen therapy
Assure adequate ventilation
Assess/control major bleeding
Assess circulation
Assess skin (color, temperature and condition)
Identify priority patients/make transport decision
FOCUSED HISTORY AND PHYSICAL EXAMINATION/RAPID ASSESSMENT Signs and symptoms
(Assess history of present illness)
How do you feel?
Medical problem?
General or local
Past pertinent history
Last oral intake
Event(s) leading to present illness
(rule out trauma)
Perform focused physical examination
(assess affected body part/system or, if indicated, complete rapid assessment)
Vitals
(obtain baseline vital signs)
Interventions
(obtain medical direction or verbalize standing order for medication interventions and verbalize proper additional
intervention/treatment) Transport
(re-evaluate transport decision)
Verbalize the consideration for completing a detailed physical examination
ONGOING ASSESSMENT (verbalize) Repeat initial assessment
Repeat vital signs
Repeat focused assessment regarding patient complaint or injuries
Critical Criteria Did not take, or verbalize, standard precautions when necessary Did not determine scene safety Did not obtain medical direction or verbalize standing orders for medical interventions Did not provide high concentration of oxygen Did not find or manage problems associated with airway, breathing, hemorrhage or shock (hypoperfusion) Did not differentiate patient's need for transportation versus continued assessment at the scene Did detailed or focused history/physical examination before assessing the airway, breathing and circulation Did not ask questions about the present illness Administered a dangerous or inappropriate intervention Any other action or inaction causing patient harm or unnecessary pain
Page 23 of 73
Basic EMT Skills Manual
H. Waid Ray, 17th Edition
Instructions to the Candidate: Trauma Assessment
This station is designed to test your ability to perform a patient assessment of a victim of multi-systems trauma and "voice-treat" all conditions and injuries discovered. You must conduct your assessment as you would in the field including communicating with your patient. You may remove the patient's clothing down to shorts or swimsuit if you feel it is necessary. As you conduct your assessment, you should state everything you are assessing. Clinical information not obtainable by visual or physical inspection will be given to you after you demonstrate how you would normally, gain that information. You may assume that you have two EMTs working with you and that they are correctly carrying out the verbal treatments you indicate. You have (10) ten minutes to complete this skill station. Do you have any questions?
Page 24 of 73
Basic EMT Skills Manual
H. Waid Ray, 17th Edition
Trauma Assessment
Take or verbalize standard precautions
Scene Size-Up
Determine the scene is safe
Determine the mechanism of injury
Determine the number of patients
Request additional help if necessary
Consider stabilization of spine
Initial Assessment
Verbalize general impression of the patient
Determine responsiveness/level of consciousness
Determine chief complaint/apparent life threats
Initiate appropriate oxygen therapy
Assess airway and breathing
Assure adequate ventilation
Injury management
Assess/control major bleeding
Assess circulation
Assess skin (color, temperature and condition)
Identify priority patients/make transport decision
Focused History And Physical Examination/Rapid Trauma Assessment
Select appropriate assessment
(focused or rapid assessment)
Obtain, or direct assistant to obtain, baseline vital signs
Obtain S.A.M.P.L.E. history
Interventions
Transport
Detailed Physical Examination
Inspect and palpate the scalp and ears
Assess the facial areas including oral and nasal areas
Inspect and palpate the neck
Assess for tracheal deviation
Assess the chest
Assess the abdomen
Assess the abdomen/pelvis
Assess the pelvis
Verbalize assessment of genitalia/perineum as needed
1 point for each extremity IF includes inspection, palpation, and
Assess the extremities
assessment of motor, sensory and circulatory function
Assess the posterior
Manage secondary injuries and wounds appropriately
Verbalize re-assessment of the vital signs
Critical Criteria Did not take or verbalize standard precautions Did not determine scene safety Did not assess for spinal protection Did not provide for spinal protection when indicated Did not provide high concentration of oxygen Did not find, or manage, problems associated with airway, breathing, hemorrhage or shock: (hypoperfusion) Did not differentiate patient's need for transportation versus continued assessment at the scene Did other detailed physical examination before assessing the airway, breathing and circulation Did not transport patient within (10) minute time limit Any other action or inaction causing patient harm or unnecessary pain
Page 25 of 73
Basic EMT Skills Manual
H. Waid Ray, 17th Edition
Instructions to the Candidate: Direct
This station is designed to test your ability to control hemorrhage. This is a scenario
based testing station. As you progress through the scenario, you will be given various
signs and symptoms appropriate for the patient's condition. You will be required to
manage the patient based on these signs and symptoms. A scenario will be read aloud
to you and you will be given an opportunity to ask clarifying questions about the
scenario, however, you will not receive answers to any questions about the actual steps
of the procedures to be performed. You may use any of the supplies and equipment
available in this room. You have ten (10) minutes to complete this skill station. Do you
have any questions?
General Considerations:
Treat to Prevent Shock (hypoperfusion).
• Use standard precautions.
• Maintain airway/artificial ventilation and apply high flow oxygen.
• Control any external bleeding using numerous stacked, sterile dressings
(approximately two to three inches in height).
• If signs of shock (hypoperfusion) are present and the lower abdomen is tender
and pelvic injury is suspected, apply and inflate PASG if approved by medical control.
• Elevate the lower extremities approximately 8 to 12 inches (Trendelenburg
position). If the patient has serious injuries to the pelvis, lower extremities, head, chest, abdomen, or neck, elevate the spine board.
• Splint any suspected bone or joint injuries.
• Prevent loss of body heat by covering the patient with a blanket and placing a
blanket under the patient.
• Initiate a volume-replacing IV on the patient at an appropriate infusion rate.
• Immediately transport and perform on-going assessment.
Page 26 of 73
Basic EMT Skills Manual
H. Waid Ray, 17th Edition
Direct Pressure
Take or verbalize standard precautions
Apply direct pressure to the wound using numerous stacked, sterile dressings
(approximately two to three inches in height)
Note: The bleeding is now controlled
Bandage the wound using Kerlix, triangular bandages, tape or some other
appropriate form of bandaging
Critical Criteria Did not take, or verbalize, standard precautions Did not control hemorrhage using correct procedures in a timely manner Any other action or inaction causing patient harm or unnecessary pain
Page 27 of 73
Basic EMT Skills Manual
H. Waid Ray, 17th Edition
Tourniquet
Note: Direct pressure has failed to control bleeding
Instruct a second rescuer to continue applying direct pressure
Immediately apply a tourniquet proximal to the wound tightened until the first
of bleeding being controlled or the pulse distal to the tourniquet being lost
Note: The bleeding is now controlled
Bandage the wound using fresh, numerous stacked sterile dressings
(approximately two to three inches in height)
Note: The patient is now showing signs and symptoms indicative of hypoperfusion
Properly position the patient
Apply high concentration oxygen
Initiate steps to prevent heat loss from the patient
Indicate the need for immediate transport
Critical Criteria Did not control hemorrhage in a timely manner Did not apply high concentration of oxygen Did not indicate a need for immediate transportation Any other action or inaction causing patient harm or unnecessary pain
Page 28 of 73
Basic EMT Skills Manual
H. Waid Ray, 17th Edition
Instructions to the Candidate: Amputation
This station is designed to test your ability to control hemorrhage by application of a
specialized bandage. This is a scenario based testing station. As you progress through
the scenario, you will be given various signs and symptoms appropriate for the patient's
condition. You will be required to manage the patient based on these signs and
symptoms. A scenario will be read aloud to you and you will be given an opportunity to
ask clarifying questions about the scenario, however, you will not receive answers to any
questions about the actual steps of the procedures to be performed. You may use any of
the supplies and equipment available in this room. You have ten (10) minutes to
complete this skill station. Do you have any questions?
Upper Extremity Elevation Guidelines:
• Amputation - elbow at 45 degrees.
Page 29 of 73
Basic EMT Skills Manual
H. Waid Ray, 17th Edition
Amputation
Take or verbalize standard precautions
Apply direct pressure to the wound using numerous stacked, sterile dressings
Note: The bleeding is now controlled
Apply roller gauze using "boxing glove" analogy
Apply roller gauze using "figure eight" analogy
Apply roller gauze to forearm/leg
Apply sling elevating extremity
Apply at least one swathe
Note: Candidate may verbalize the following steps Find the amputated part
Remove any large, adherent debris
Irrigate with sterile normal saline
Wrap the amputated part with sterile gauze moistened with sterile saline and
place in a plastic bag
Place first plastic bag in second plastic bag with cooling agent
Critical Criteria Did not take, or verbalize, standard precautions Applied a tourniquet before attempting other methods of bleeding control Did not apply roller gauze correctly Did not sling or swathe or slung at inappropriate angle Failed to describe proper care of amputated part Any other action or inaction causing patient harm or unnecessary pain
Page 30 of 73
Basic EMT Skills Manual
H. Waid Ray, 17th Edition
Instructions to the Candidate: Eye Irrigation and
Bandaging
This station is designed to test your ability to properly irrigate, dress and bandage an eyeball wound. You are required to treat only the specific, isolated injury to the eye. The scene size-up and initial assessment have been completed and during the focused assessment an avulsed eye was detected. Ongoing assessment of the patient's airway, breathing, and central circulation is not necessary. You may use any equipment available in this room. You have five (5) minutes to complete this skill station. Do you have any questions?
Page 31 of 73
Basic EMT Skills Manual
H. Waid Ray, 17th Edition
Eye Irrigation and Bandaging
Take or verbalize standard precautions
Maintain cervical immobilization, if necessary
Control bleeding as appropriate without applying pressure to globe of eye
Retrieve at least one (1) liter bottle of sterile normal saline
Irrigate eye from medial to lateral for at least five to ten minutes
Apply 4x4 dressings in ring around globe
Apply 4x4 dressings moistened with sterile normal saline over globe
Apply 4x4 dressings moistened with sterile normal saline in cup
Apply roller gauze to stabilize cup over globe
Cover uninjured eye
Critical Criteria Did not take, or verbalize, standard precautions Failed to irrigate with sterile normal saline Failed to irrigate from medial to lateral Failed to apply dressings in appropriate manner Did not apply roller gauze correctly Failed to cover uninjured eye Any other action or inaction causing patient harm or unnecessary pain
Page 32 of 73
Basic EMT Skills Manual
H. Waid Ray, 17th Edition
Instructions to the Candidate: Head Bandage
This station is designed to test your ability to properly dress and bandage a soft tissue
injury to the head. You are required to treat only the specific, isolated injury to the head.
The scene size-up and initial assessment have been completed and during the focused
assessment an extruded eye was detected. Ongoing assessment of the patient's airway,
breathing, and central circulation is not necessary. You may use any equipment
available in this room. You have five (5) minutes to complete this skill station. Do you
have any questions?
General Considerations:
• Apply direct pressure to wound to control bleeding only if depressed skull fracture
is not suspected.
• Control bleeding from the edges of wounds by direct pressure.
Page 33 of 73
Basic EMT Skills Manual
H. Waid Ray, 17th Edition
Head Bandage
Take or verbalize standard precautions
Maintain cervical immobilization, if necessary
Control bleeding as appropriate without applying pressure to the wound
Apply numerous stacked, sterile 4x4 dressings over the wound
Apply roller gauze, cravat or other bandage to stabilize dressings over the
wound WITHOUT applying pressure to skull
Critical Criteria Did not take, or verbalize, standard precautions Failed to apply dressings in appropriate manner Did not apply roller gauze, cravat or other bandage correctly Applied pressure to skull Any other action or inaction causing patient harm or unnecessary pain
Page 34 of 73
Basic EMT Skills Manual
H. Waid Ray, 17th Edition
Instructions to the Candidate: Impaled Objects
This station is designed to test your ability to properly dress and bandage an impaled
object. You are required to treat only the specific, isolated injury. The scene size-up and
initial assessment have been completed and an impaled object was detected during the
focused assessment. Ongoing assessment of the patient's airway, breathing, and central
circulation is not necessary. You may use any equipment available in this room. You
have five (5) minutes to complete this skill station. Do you have any questions?
General Considerations:
• Pressure may be used around the wound to aid in bleeding control.
• Do not wrap bandaging over the impaled object.
• The impaled object may be removed ONLY if the airway is compromised.
Page 35 of 73
Basic EMT Skills Manual
H. Waid Ray, 17th Edition
Impaled Objects
Take or verbalize standard precautions
Control bleeding as appropriate
Apply numerous stacked, sterile dressings 4x4 dressings around the impaled object
Note: An occlusive dressing must be applied first if the impaled object
is in the chest
Apply numerous stacked multiple trauma dressings around impaled object
Apply roller gauze, cravat or other bandage to stabilize multiple trauma
dressings around impaled object securing it in three planes
Critical Criteria Did not take, or verbalize, standard precautions Failed to apply dressings in appropriate manner Did not apply roller gauze, cravat or other bandage correctly Failed to apply occlusive dressing to impaled object in chest Any other action or inaction causing patient harm or unnecessary pain
Page 36 of 73
Basic EMT Skills Manual
H. Waid Ray, 17th Edition
Instructions to the Candidate: Long Bone Injuries
This station is designed to test your ability to properly immobilize a closed, non-
angulated long bone injury. You are required to treat only the specific, isolated injury to
the extremity. The scene size-up and initial assessment have been completed and
during the focused assessment a closed, non-angulated injury of the (radius-ulna, hip,
tibia-fibula) was detected. Ongoing assessment of the patient's airway, breathing, and
central circulation is not necessary. You may use any equipment available in this room.
You have five (5) minutes to complete this skill station. Do you have any questions?
General Considerations:
• Swathes should not be in contact with a suspected fracture site.
• Knots should be tied in void areas and padded as needed.
• Utilize at least two swathes for better immobilization.
• Legs should be tied together to prevent movement.
• Gently move uninjured leg to injured leg.
• Place padding between the legs.
Upper Extremity Elevation Guidelines:
• Radius-Ulna – elbow at 60 degrees.
• Humerus - elbow at 90 degrees.
• Clavicle - elbow at 90 degrees.
Page 37 of 73
Basic EMT Skills Manual
H. Waid Ray, 17th Edition
Board Immobilization – Hip
Possible Awarded
Take or verbalize standard precautions
Direct application of manual stabilization of the injury
Assess motor, sensory and circulatory function in the injured extremity
Note: Motor, sensory and circulatory function are present and normal
Measure the splint
Apply the splint
Immobilize the joint above the injury site
Immobilize the joint below the injury site
Secure the entire injured extremity
Immobilize the foot in the position of function
Reassess motor, sensory and circulatory function in the injured extremity
Note: Motor, sensory and circulatory function are present and normal
Critical Criteria Grossly moves the injured extremity Did not immobilize the joint above and the joint below the injury site Did not reassess motor, sensory and circulatory function in the injured extremity before and after
Any other action or inaction causing patient harm or unnecessary pain
Page 38 of 73
Basic EMT Skills Manual
H. Waid Ray, 17th Edition
Board Immobilization – Radius/Ulna
Possible Awarded
Take or verbalize standard precautions
Direct application of manual stabilization of the injury
Assess motor, sensory and circulatory function in the injured extremity
Note: Motor, sensory and circulatory function are present and normal
Measure the splint
Apply the splint
Immobilize the joint above the injury site
Immobilize the joint below the injury site
Secure the entire injured extremity
Immobilize the hand in the position of function
Reassess motor, sensory and circulatory function in the injured extremity
Note: Motor, sensory and circulatory function are present and normal
Critical Criteria Grossly moves the injured extremity Did not immobilize the joint above and the joint below the injury site Did not reassess motor, sensory and circulatory function in the injured extremity before and after
Any other action or inaction causing patient harm or unnecessary pain
Page 39 of 73
Basic EMT Skills Manual
H. Waid Ray, 17th Edition
Board Immobilization – Tibia/Fibula
Possible Awarded
Take or verbalize standard precautions
Direct application of manual stabilization of the injury
Assess motor, sensory and circulatory function in the injured extremity
Note: Motor, sensory and circulatory function are present and normal
Measure the splint
Apply the splint
Immobilize the joint above the injury site
Immobilize the joint below the injury site
Secure the entire injured extremity
Immobilize the foot in the position of function
Reassess motor, sensory and circulatory function in the injured extremity
Note: Motor, sensory and circulatory function are present and normal
Critical Criteria Grossly moves the injured extremity Did not immobilize the joint above and the joint below the injury site Did not reassess motor, sensory and circulatory function in the injured extremity before and after
Any other action or inaction causing patient harm or unnecessary pain
Page 40 of 73
Basic EMT Skills Manual
H. Waid Ray, 17th Edition
Instructions to the Candidate: Flail Chest
This station is designed to test your ability to properly immobilize a flail chest. You are required to treat only the specific, isolated injury. The scene size-up and initial assessment have been completed and during the focused assessment a flail chest was detected. Ongoing assessment of the patient's airway, breathing, and central circulation is not necessary. You may use any equipment available in this room. You have five (5) minutes to complete this skill station. Do you have any questions?
Page 41 of 73
Basic EMT Skills Manual
H. Waid Ray, 17th Edition
Flail Chest
Take or verbalize standard precautions
Apply high flow oxygen
Cover flail segment with bulky dressings
Apply roller gauze, cravats or other bandage to stabilize dressing over flail
segment Position patient in semi-fowler's position unless suspicion of cervical injury
Critical Criteria Did not take, or verbalize, standard precautions Failed to apply bulky dressings in appropriate manner Did not apply roller gauze, cravat or other bandage correctly Failed to properly position patient Any other action or inaction causing patient harm or unnecessary pain
Page 42 of 73
Basic EMT Skills Manual
H. Waid Ray, 17th Edition
Instructions to the Candidate: Foot/Ankle Injury
This station is designed to test your ability to properly immobilize a closed, non-angulated foot/ankle injury. You are required to treat only the specific, isolated injury to the extremity. The scene size-up and initial assessment have been completed and during the focused assessment a closed, non-angulated injury of the (foot, ankle) was detected. Ongoing assessment of the patient's airway, breathing, and central circulation is not necessary. You may use any equipment available in this room. You have five (5) minutes to complete this skill station. Do you have any questions?
Page 43 of 73
Basic EMT Skills Manual
H. Waid Ray, 17th Edition
Foot/Ankle Injury
Possible Awarded
Take or verbalize standard precautions
Assess motor, sensory and circulatory function in the injured extremity
Note: Motor, sensory and circulatory function are present and normal
Select the proper splinting material
Immobilize the site of the injury
Immobilize the foot in the position of function
Reassess motor, sensory and circulatory function in the injured extremity
Note: Motor, sensory and circulatory function are present and normal
Critical Criteria
Grossly moves the injured extremity Did not immobilize the joint above and, if possible, the joint below the injury site Did not reassess motor, sensory and circulatory function in the injured extremity before and after
Any other action or inaction causing patient harm or unnecessary pain
Page 44 of 73
Basic EMT Skills Manual
H. Waid Ray, 17th Edition
Instructions to the Candidate: Joint Injury Management
This station is designed to test your ability to properly immobilize a non-complicated knee injury. You are required to treat only the specific, isolated injury to the knee. The scene size-up and initial assessment have been accomplished on the victim and during the focused assessment a knee injury was detected. Ongoing assessment of the patient's airway, breathing and central circulation is not necessary. You may use any equipment available in this room. You have five (5) minutes to complete this skill station. Do you have any questions?
Page 45 of 73
Basic EMT Skills Manual
H. Waid Ray, 17th Edition
Joint Injury Management
Possible Awarded
Take or verbalize standard precautions
Direct application of manual stabilization of the knee injury
Assess motor, sensory and circulatory function in the injured extremity
Note: Motor, sensory and circulatory function are present and normal
Select the proper splinting material
Immobilize the site of the injury
Immobilize the bone above the injured joint
Immobilize the bone below the injured joint
Reassess motor, sensory and circulatory function in the injured extremity
Note: Motor, sensory and circulatory function are present and normal
Critical Criteria Did not support the joint so that the joint did not bear distal weight Did not immobilize the bone above and below the injured site Did not reassess motor, sensory and circulatory function in the injured extremity before and after
Any other action or inaction causing patient harm or unnecessary pain
Page 46 of 73
Basic EMT Skills Manual
H. Waid Ray, 17th Edition
PASG Fact Sheet
Other Name:
• Also known as MAST trousers.
Indications:
• Isolated fractures of legs without evidence of other internal injuries.
• Pelvic instability.
Contraindications:
• Pulmonary edema as evidenced by rales and/or rhonchi.
• Uncontrolled bleeding.
Cautious Use:
• Chest trauma, particularly penetrating trauma.
• Abdominal aortic aneurysm. • Head injuries, particularly closed head injuries.
Modified Use (Do NOT Inflate the Abdominal Compartment):
• Pregnancy. • Abdominal evisceration.
• Impaled objects in the abdomen. • If an impaled object is in a leg, do not inflate that leg or the abdominal compartment.
Application:
• Remove as much clothing as possible and belt buckles, keys, etc. • For trauma patients, use either of the following:
1. Scoop stretcher, or 2. Log roll.
• The suit is properly seated when positioned at the groin and the lowest anterior rib.
• Inflate only until fracture is stabilized increasing the systolic pressure no more than ten
• The person checking the blood pressure during inflation should palpate a systolic
pressure at least every five to ten pumps.
• Close all three stop cocks and tape shut.
• Don't remove pump after inflation; bundle between patient legs.
Altitude and Temperature:
• Suit pressure increases as altitude and temperature increase.
• Suit pressure decreases as altitude and temperature decrease.
Page 47 of 73
Basic EMT Skills Manual
H. Waid Ray, 17th Edition
Instructions to the Candidate: PASG – Splint
This station is designed to test your ability to splint using PASG. This is a scenario
based testing station. As you progress through the scenario, you will be given various
signs and symptoms appropriate for the patient's condition. You will be required to
manage the patient based on these signs and symptoms. A scenario will be read aloud
to you and you will be given an opportunity to ask clarifying questions about the
scenario, however you will not receive answers to any questions about the actual steps
of the procedures to be performed. You may use any of the supplies and equipment
available in this room. You have ten (10) minutes to complete this skill station. Do you
have any questions?
General Considerations:
• Local protocols may determine the use of PASG.
• The pressure inside the suit is not being monitored.
• Never increase the systolic pressure more than 10 points.
• The proper size PASG should be used on pediatric patients.
• PASG alone will not serve as a traction device.
• PASG, used with a long spine board, is the preferred treatment for pelvic
• When used with traction splints: The traction splint is to be applied first, applying
traction and securing leg straps. Then apply the trousers over the traction splint. Inflate the trousers in the appropriate sequence.
• The PASG device must be cleaned with mild soap and water and allowed to air-
dry after each use.
• DO NOT USE BLEACH.
• DO NOT DRY IN DIRECT SUNLIGHT.
Page 48 of 73
Basic EMT Skills Manual
H. Waid Ray, 17th Edition
PASG – Splint
Take or verbalize standard precautions
Assess pulse rate and blood pressure
Remove clothing and/or any objects that may cause pressure points
Apply PASG to patient using appropriate method
Enclose patient in PASG suit appropriately
Connect hoses and open all stopcocks
Inflate PASG appropriately
Close all stopcocks and verbalize taping
Reassess pulse rate and blood pressure
Note: The candidate verbalizes application for splinting purposes. Verbalizes appropriate method of application
Verbalizes appropriate inflation criteria
Critical Criteria
Did not take, or verbalize, standard precautions
Did not correctly apply PASG either by technique or nature of illness
Increased systolic pressure more than 10 points
Did not verbalize any required information correctly
Any other action or inaction causing patient harm or unnecessary
Page 49 of 73
Basic EMT Skills Manual
H. Waid Ray, 17th Edition
Instructions to the Candidate: Sling and Swathe
This station is designed to test your ability to properly immobilize a non-complicated humerus injury. You are required to treat only the specific, isolated injury to the humerus. The scene size-up and initial assessment have been accomplished on the victim and during the focused assessment, a humerus injury was detected. Ongoing assessment of the patient's airway, breathing and central circulation is not necessary. You may use any equipment available in this room. You have five (5) minutes to complete this skill station. Do you have any questions?
Page 50 of 73
Basic EMT Skills Manual
H. Waid Ray, 17th Edition
Sling and Swathe
Possible Awarded
Take or verbalize standard precautions
Direct application of manual stabilization of the humerus injury
Assess motor, sensory and circulatory function in the injured extremity
Note: Motor, sensory and circulatory function are present and normal
Select the proper splinting material
Immobilize the site of the injury
Immobilize the bone above the injured joint
Immobilize the bone below the injured joint
Reassess motor, sensory and circulatory function in the injured extremity
Note: Motor, sensory and circulatory function are present and normal
Critical Criteria Did not support the joint so that the joint did not bear distal weight Did not immobilize the bone above and below the injured site Did not reassess motor, sensory and circulatory function in the injured extremity before and after
Any other action or inaction causing patient harm or unnecessary pain
Page 51 of 73
Basic EMT Skills Manual
H. Waid Ray, 17th Edition
Instructions to the Candidate: Traction Splinting
This station is designed to test your ability to properly immobilize a mid-shaft femur injury
with a traction splint. You will have an EMT assistant to help you in the application of the
device by applying manual traction when directed to do so. You are required to treat only
the specific, isolated injury to the femur. The scene size-up and initial assessment have
been accomplished on the victim and during the focused assessment a mid-shaft femur
deformity was detected. Ongoing assessment of the patient's airway, breathing, and
central circulation is not necessary. You may use any equipment available in this room.
You have ten (10) minutes to complete this skill station. Do you have any questions?
Indications:
• Painful, swollen, deformed mid-thigh with no joint or lower leg injury.
Contraindications:
• Injury is to the knee;
• Injury is within one or two inches of the knee;
• Injury to the hip;
• Injury to the pelvis;
• Partial amputation or avulsion with bone separation, distal limb is connected only
by marginal tissue; or
• Lower leg or ankle injury.
General Considerations:
• During immobilization of an open femur, care should be taken to avoid pulling the
bone ends back onto the skin. Stop traction when the bone ends just begin to move.
Use with PASG Device:
• The traction splint is applied first, applying proper mechanical traction and
securing the leg straps. Then apply the PASG over the traction splint and inflate the trousers.
Page 52 of 73
Basic EMT Skills Manual
H. Waid Ray, 17th Edition
Traction Splint
Possible Awarded
Take or verbalize standard precautions
Direct application of manual stabilization of the injured leg
Assess motor, sensory and circulatory function in the injured extremity
Note: Motor, sensory and circulatory function are present and normal.
Prepare/adjust splint to the proper length
Direct the application of manual traction
Position the splint under the injured leg
Apply the proximal securing device (e.g. ischial strap)
Apply the distal securing device (e.g. ankle hitch)
Apply mechanical traction
Position/secure the support straps
Re-evaluate the proximal/distal securing devices
Reassess motor, sensory and circulatory function in the injured extremity
Note: Motor, sensory and circulatory function are present and normal.
Note: The examiner asks the candidate how he/she would prepare the patient for transportation.
Verbalize securing the torso to the long board to immobilize the hip
Verbalize securing the splint to the long board to prevent movement of the splint
Critical Criteria Loss of traction at any point after it was applied Did not reassess motor, sensory and circulatory function in the injured extremity before and after
The foot was excessively rotated or extended after splint was applied Did not secure the ischial strap before pulling mechanical traction Final Immobilization failed to support the femur or prevent rotation of the injured leg Secured the leg to the splint before applying mechanical traction Any other action or inaction causing patient harm or unnecessary pain
Note: If the leg is elevated at all, manual traction must be applied before elevating the leg. The ankle hitch may be applied before elevating the leg and used to provide manual traction.
Page 53 of 73
Basic EMT Skills Manual
H. Waid Ray, 17th Edition
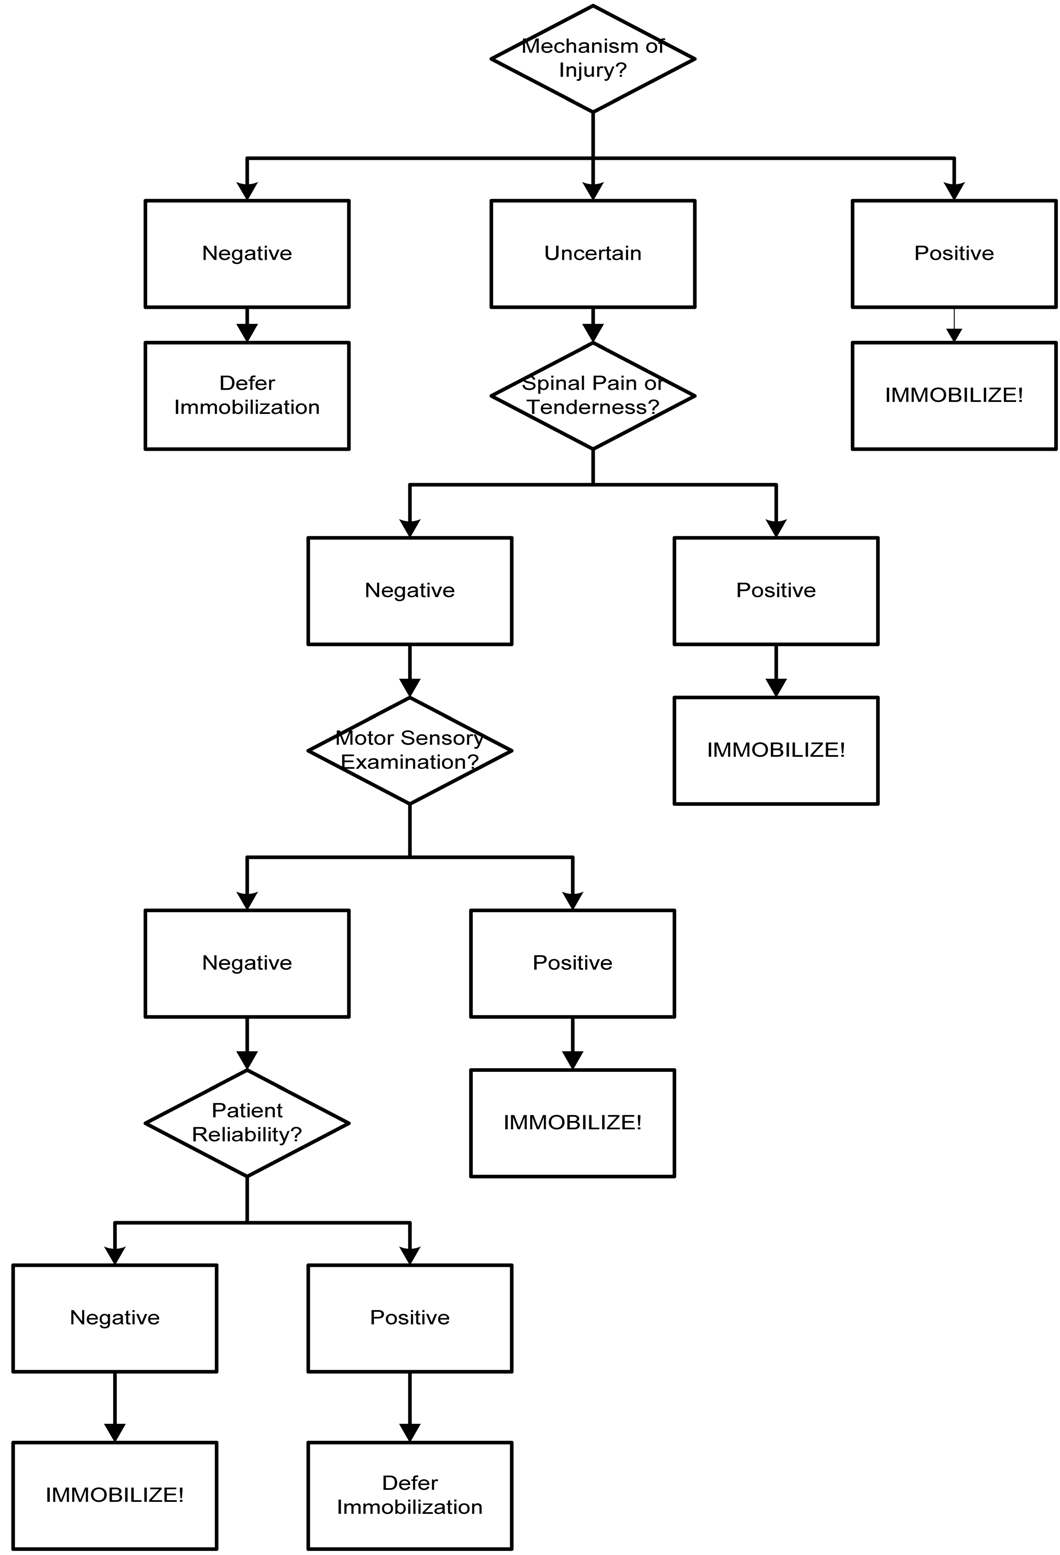
The Maine Protocol
The Maine Protocol is a methodology of assessing patients for potential spinal injuries and excluding those patients who most likely do not need spinal immobilization. Four separate criteria are evaluated: 1) Mechanism of injury; 2) Pain and/or tenderness along the spine; 3) Motor and sensory criteria; and 4) Patient reliability. • Mechanism of Injury – Not every violent or traumatic event creates a spinal injury.
Most low-speed, non-violent crashes do not generate enough energy to prompt spinal injuries (i.e. twisted ankle). Accordingly, if the mechanism of injury seen demonstrates high velocity or high energy, only then should the EMT become overly concerned with spinal stabilization (i.e. high-speed rollover; falls from heights; etc.).
• Spinal Assessment – It is rare that spinal injuries do not prompt some form of pain or
discomfort. The pain is either continuous, upon patient movement, or upon palpation. Accordingly, a reliable patient with no pain probably has no spinal injury. However, make certain to follow the entire algorithm before making this determination.
• Motor and Sensory Examination – Injuries to the spinal cord almost always cause
some form of distal neurological manifestation. This can be evidenced by outright paralysis or perhaps tingling in the extremities. The motor function is tested by using the "push" and "pull" technique on the feet. On the upper extremities, the patient's fingers are tested by pushing on the dorsal surface and checking to see if the patient can mount counterforce. Also, the patient's fingers are spread apart and the EMT checks to see if the patient can resist squeezing the index and ring fingers together.
• Patient Reliability – Patients who have altered mental status for any reason cannot
be relied upon to properly respond to pain or to accurately participate in the motor and sensory examination. Accordingly any patient with altered mental status for any reason (e.g. brain injury, alcohol or drug consumption, postictal status, distracting injuries) should be treated as if they have a spinal injury. In order to be considered reliable, a patient must have the four "C's" in place: conscious, cooperative, calm and clean (i.e. sober).
The chart on the following page graphically illustrates the flow of the algorithm and should be used in conjunction with the information on this page.
Page 54 of 73
Basic EMT Skills Manual
H. Waid Ray, 17th Edition
The Maine Protocol - Flow Chart
Page 55 of 73
Basic EMT Skills Manual
H. Waid Ray, 17th Edition
Instructions to the Candidate: Clam Shell Device
This station is designed to rest your ability to provide spinal immobilization on a patient
using a clam shell immobilization device. You and an EMT assistant arrive on the scene
of an automobile crash. The scene is safe and there is only one patient. The assistant
EMT has completed the initial assessment and no critical condition requiring intervention
was found. For the purpose of this station, the patient's vital signs remain stable. You are
required to treat the specific, isolated problem of an unstable spine using a clam shell
immobilization device. You are responsible for the direction and subsequent actions of
the EMT assistant. Transferring and immobilizing the patient to the long backboard
should be accomplished verbally. You have ten (10) minutes to complete this skill
station. Do you have any questions?
General Considerations:
• This device does not effectively complete the spinal immobilization process.
• Patient must be moved and secured to a long spine board to provide adequate
spinal immobilization.
• Groin straps will need to be released once patient is moved to a long spine
• Rapid extrication methods are performed instead of using this device if at any
time: 1. There is an immediate danger to the patient (fire, explosion, etc.), or 2. The initial assessment indicates a condition (profound hypoperfusion) that
requires immediate intervention that cannot be accomplished in the vehicle.
Page 56 of 73
Basic EMT Skills Manual
H. Waid Ray, 17th Edition
Clam Shell Device
Take or verbalize standard precautions
Direct assistant to gently move the head to the neutral in-line position
Direct assistant to maintain manual immobilization of the head
Reassess motor, sensory and circulatory function in each extremity
Apply appropriately sized extrication collar
Insert device correctly (top first)
Seat device in Axilla
Connect middle chest strap
Connect groin straps
Connect bottom torso strap
Connect top chest strap
Reassess breathing
Secure feet, knees & hands
Secure head to board, padding if necessary
Recheck connections
Reassess motor, sensory and circulatory function in each extremity
Reassess airway & breathing
Verbalize moving the patient to a long board
Verbalize slowly releasing groin straps
Critical Criteria Did not immediately direct, or take, manual immobilization of the head Released, or ordered release of, manual immobilization before it was maintained mechanically Patient manipulated, or moved excessively, causing potential spinal compromise Device moved excessively up, down, left or right on the patient's torso Head immobilization allows for excessive movement Torso fixation inhibits chest rise, resulting in respiratory compromise Upon completion of immobilization, head is not in the neutral position Did not assess motor, sensory and circulatory function in each extremity after voicing
immobilization to the long board
Immobilized head to the board before securing the torso Any other action or inaction causing patient harm or unnecessary pain Note: If an XP-1 device is used instead of a KED, the shoulder straps are connected at the same time as the top chest strap and failure to connect them at that time is a critical error (meets Critical Criteria).
Page 57 of 73
Basic EMT Skills Manual
H. Waid Ray, 17th Edition
Instructions to the Candidate: Long Spine Board
This station is designed to test your ability to provide spinal immobilization on a patient
using a long spine board immobilization device. You arrive on the scene with an EMT
assistant. The assistant EMT has completed the scene size-up as well as the initial
assessment and no critical condition was found which would require intervention. For the
purpose of this testing station, the patient's vital signs remain stable. You are required to
treat the specific problem of an unstable spine using a long spine board immobilization
device. When moving the patient to the device, you should use the help of the assistant
EMT and the evaluator. The assistant EMT should control the head and cervical spine of
the patient while you and the evaluator move the patient to the immobilization device.
You are responsible for the direction and subsequent action of the EMT assistant and
the evaluator. You may use any equipment available in this room. You have ten (10)
minutes to complete this skill station. Do you have any questions?
General Considerations:
• When neutral position of the head cannot be safely attained, immobilize the head
in the position found.
• If the board is too short for the patient, always ensure that the head, neck, and
spine are centered on the board properly. The feet and lower legs may extend past the end of the board if necessary.
• If a chinstrap is used, make sure the patient can open their mouth to prevent
aspiration should vomiting occur.
Page 58 of 73
Basic EMT Skills Manual
H. Waid Ray, 17th Edition
Long Spine Board
Possible Awarded
Takes, or verbalizes, standard precautions
Direct assistant to gently move the head to the neutral in-line position
Directs assistant to maintain manual immobilization of the head
Reassesses motor, sensory and circulatory function in each extremity
Applies appropriately sized extrication collar
Positions the immobilization device appropriately
Directs movement of the patient onto the device without compromising the integrity
of the spine Applies padding to voids between the torso and the board as necessary
Immobilizes the patient's torso to the device
Evaluates and pads behind the patient's head as necessary
Immobilizes the patient's head to the device
Secures the patient's legs to the device
Secures the patient's arms to the device
Reassesses motor, sensory and circulatory function in each extremity
Critical Criteria Did not immediately direct, or take, manual immobilization of the head Released, or ordered release of, manual immobilization before it was maintained mechanically Patient manipulated, or moved excessively, causing potential spinal compromise Patient moves excessively up, down, left or right on the patient's torso Head immobilization allows for excessive movement Upon completion of immobilization, head is not in the neutral position Did not assess motor, sensory and circulatory function in each extremity after immobilization to the
Immobilized head to the board before securing the torso Any other action or inaction causing patient harm or unnecessary pain
Page 59 of 73
Basic EMT Skills Manual
H. Waid Ray, 17th Edition
Electrical Anatomy of the Heart
An electrical impulse is generated in a small piece of tissue known as the Sino-Atrial (SA) node. The SA node routinely generates this electrical impulse about 80 to 100 times per minute. The SA node can be influenced to increase and decrease the rate at which it generates this impulse. Once generated, the electrical impulse can travel in the nerves of the heart at approximately 120 meters per second (270 miles per hour). Therefore, the electrical impulses, unless slowed or stopped, can travel the full distance of the heart in milliseconds. The impulse travels into the Atria via the Interatrial tracts and downward into the lower chambers of the heart via the Internodal tracts. The impulses into the Atria terminate in nerve cells called Purkinje fibers and cause a simultaneous contraction of the atrial muscle fibers. The impulse that travels downward into the lower chambers next reaches a piece of tissue known as the Atrio-Ventricular (AV) node. The impulse is then delayed for a fraction of a second. The delay is necessary because of the speed at which the impulse travels through the nerve fibers of the heart. If the impulse were not delayed, the Atria and Ventricles would contract at essentially the same time impeding blood flow through the heart. If the AV node does not receive a signal from the SA node, it will eventually generate an impulse of its own. The impulse continues its travel downward through bundles of nerve tissue known as the Right and Left Bundle Branches. The impulse finally terminates in nerve cells called Purkinje fibers which cause a simultaneous contraction of the Ventricular muscle fibers. If no impulse is received from the SA or AV nodes, the Purkinje fibers will initiate their own impulse.
Page 60 of 73
Basic EMT Skills Manual
H. Waid Ray, 17th Edition
Instructions to the Candidate: Cardiac Arrest
Management (CPR/AED)
This station is designed to test your ability to coordinate CPR, administer defibrillation to a patient using an Automated External Defibrillator (AED) and provide advance airway management. You should conduct yourself as if this were a real patient. You have five (5) minutes to complete this station. Do you have any questions?
Page 61 of 73
Basic EMT Skills Manual
H. Waid Ray, 17th Edition
Cardiac Arrest Management (CPR/AED)
Possible Awarded
Assessment
Take or verbalize standard precautions
Briefly question the first responder about arrest events
Direct the first responder to stop CPR
Verify absence of spontaneous pulse
Note: Examiner states "No pulse"
Direct resumption of CPR
Turn on AED power
Attach AED to patient at proper points
Direct first responder to stop CPR and ensure all individuals are clear of patient
Initiate analysis of the patient's heart rhythm
Verify absence of spontaneous pulse
Note: Examiner states "No pulse"
Transition
Direct resumption of CPR for two minutes
Gather additional information about arrest event
Confirm effectiveness of CPR (check central pulse during and between compressions;
auscultate breath sounds)
Integration
Insert airway adjunct
Ventilate of direct ventilation of the patient
Attach high flow oxygen
Assure CPR continues without unnecessary or prolonged interruption
Re-evaluate patient in approximately two minutes
Repeat defibrillator sequence
Verify absence of spontaneous pulse
Transportation
Verbalizes emergency transportation of the patient
Critical Criteria Did not take, or verbalize, standard precautions Did not evaluate the need for immediate use of the AED Did not direct initiation/resumption of ventilations/compressions at appropriate times Did not assure all individuals were clear of patient before analyzing/delivering each shock Did not operate the AED properly (inability to deliver shocks) Prevented the AED from delivering indicated shocks Any other action or inaction causing patient harm or unnecessary pain
Page 62 of 73
Basic EMT Skills Manual
H. Waid Ray, 17th Edition
Nitroglycerin (NTG)
(NitroStat, NitroDur, NitroBid)
Description:
• Used in the management of chest pain associated with both angina and acute
myocardial infarction.
Actions:
• Nitroglycerin is a rapid smooth-muscle relaxant that causes decreased cardiac
• Nitroglycerin dilates both arteries and veins and causes venous pooling of blood.
• Nitroglycerin causes vasodilation of coronary arteries, thus increasing perfusion
of ischemic myocardium.
• Pain relief occurs within 2 minutes and therapeutic effects can be observed up to
30 minutes later.
Indications:
• Chest pain associated with angina pectoris.
• Chest pain associated with acute myocardial infarction.
Contraindications:
• Nitroglycerin is contraindicated in patients with increased intracranial pressure
• Hypotension or blood pressure below 100 mmHg systolic, hypovolemia, aortic
stenosis, right ventricle infarction, and severe bradycardia or tachycardia.
• Recent use (within 24 hours) of Viagra, Cialis or other similar medication.
Precautions:
• May induce headaches from vasodilation of cerebral vessels.
• Patients may build up a tolerance.
• Nitroglycerin deteriorates rapidly once the bottle is opened.
• Ensure the bottle is resealed immediately after obtaining the dose.
• Ensure the nitroglycerin is current and fresh.
• Protect the nitroglycerin from light.
• One tablet (0.4 mg) sub-lingual.
• The dose may be repeated every 5 minutes to a maximum of 3 dosages.
• Sublingual, making sure the patient does not swallow the tablet.
• Also available in patches, sprays and ointment.
• Ointment/paste:
1. Dosage is 1 - 2 inches of paste (6 - 12 mg) topically applied in a 4 inch
circle on the chest.
Page 63 of 73
Basic EMT Skills Manual
H. Waid Ray, 17th Edition
Nitroglycerin Spray
(Nitrolingual Spray) / (Antianginal)
Description:
• Used in the management of chest pain associated with both angina and acute
myocardial infarction. The nitroglycerin spray is an aerosol preparation which delivers exactly 0.4 mg in each spray with a peak effect in 2 to 4 minutes.
Actions:
• Nitroglycerin is a rapid smooth-muscle relaxant that causes decreased cardiac
• Nitroglycerin dilates both arteries and veins and causes venous pooling of blood.
• Nitroglycerin causes vasodilation of coronary arteries, thus increasing perfusion
of ischemic myocardium.
• Pain relief occurs within 2 minutes and therapeutic effects can be observed up to
30 minutes later.
Indications:
• Chest pain associated with angina pectoris.
• Chest pain associated with acute myocardial infarction.
• Acute pulmonary edema.
Contraindications:
• NTG is contraindicated in patients with increased intracranial pressure.
• Hypotension or blood pressure below 100 mmHg systolic, hypovolemia, aortic
stenosis, right ventricle infarction, and severe bradycardia or tachycardia.
• Recent use (within 24 hours) of Viagra, Cialis or other similar medication.
Precautions:
• May induce headaches from vasodilation of cerebral vessels.
• Patients may develop a tolerance.
• Wipe the container's cap with an alcohol prep to reduce contamination.
Dosage/Route:
• 1 spray (0.4 mg) sublingual.
• No more than three (3) doses in 15 minutes.
• The spray should not be inhaled.
• Also available in tablets, patches, and ointment.
• Ointment/paste:
1. Dosage is 1 - 2 inches of paste (6 - 12 mg) topically applied in a 4 inch
circle on the chest.
Page 64 of 73
Basic EMT Skills Manual
H. Waid Ray, 17th Edition
Aspirin (ASA)
(Bayer, St. Josephs)
Description:
• Thrombolytic.
Actions:
• Blocks formation of Thromboxane A2 which causes platelets to aggregate and
arteries to constrict.
• Reduces overall mortality from acute myocardial infarction (AMI).
• Reduces additional infarction.
• Reduces strokes.
Indications:
• Therapy for all patients with new pain suggestive of AMI.
Contraindications:
• Patients with acute ulcer disease, gastrointestinal disease or bleeding disorders.
• Patients experiencing asthma attack.
• If the patient has already had one or more aspirin prior to arrival.
• Known hypersensitivity to aspirin.
Precautions:
• For patients with a history of asthma, be sure to verify any known tolerance of
aspirin before administration.
• Doses higher than recommended can interfere with prostacyclin production and
Side Effects:
• Sweating (usually at higher doses).
• Nausea (usually at higher doses).
• Hypotension (usually at higher doses).
• Gastrointestinal bleeding (usually at higher doses).
• 160 mg to 325 mg as soon as possible.
• Patients should chew one aspirin and take one by mouth.
Page 65 of 73
Basic EMT Skills Manual
H. Waid Ray, 17th Edition
Instructions to the Candidate: Cardiac Pain Management
(NTG/ASA)
This station is designed to test your ability to administer typical cardiac medications to a patient experiencing chest pain. You should conduct yourself as if this were a real patient. You should assume that I am the actual patient and may ask me any questions you would normally ask a patient in this situation. You have five (5) minutes to properly administer the medications to the patient. Do you have any questions?
Page 66 of 73
Basic EMT Skills Manual
H. Waid Ray, 17th Edition
Cardiac Pain Management (NTG/ASA)
Possible Awarded
Take or verbalize standard precautions
Verbalizes indication for chest pain therapy in the pre-hospital setting
• Signs & symptoms of angina
• Signs & symptoms of myocardial infarction
Contacts medical control for permission to commence therapy
Assembles appropriate equipment
• High-flow oxygen with non-rebreathing mask •
• Chewable aspirin
Calmly reassure and explain procedure to patient
Place patient on high-flow oxygen
Determine baseline vital signs (systolic B/P must be > 90 mm Hg)
Note: Some medical directors require a systolic > 100 mm HG
Ensures correct medication, expiration date and medication dosage
Correctly administers the prescribed nitroglycerin
• 1/150 grain (0.4 mg) sublingually, 1 every 5 minutes to a total of 3 tablets; OR •
0.4 mg metered aerosol spray, may be repeated twice every 5 minutes; OR
• 2 inches of 2% nitroglycerin ointment may be applied over a 2 to 4 inch area.
Observes for side-effects
• Headache (most common)
Hypotension (most serious)
• Treats hypotension with Trendelenburg positioning
Assesses effectiveness of interventions
Administers the prescribed aspirin
• 80 mg Aspirin, chewed
• 80 mg Aspirin, swallowed
Observes for side effects
• Increased bleeding time
Assesses the effectiveness of the intervention
Reassures and calms the patient
Re-evaluates and assesses vital signs for adverse reactions
Continually monitors patient
Contacts medical control, advises patient condition and request further orders
Documents procedure appropriately
Critical Criteria Did not take, or verbalize, standard precautions Did not place the patient on high-flow oxygen Did not assess baseline vital signs Did not determine the correct medication, expiration date and medication dosage Did not correctly administer the prescribed nitroglycerin Did not administer the prescribed aspirin Any other action or inaction causing patient harm or unnecessary pain
Page 67 of 73
Basic EMT Skills Manual
H. Waid Ray, 17th Edition
Oral Glucose
Description:
• Provides sugar for patients who have low blood sugar levels as determined by
blood glucometer. Glucose is the principal energy source utilized by the brain and other tissues.
Actions:
• Rapid absorption of glucose by the cells in treatment of hypoglycemia.
Indications:
• Known hypoglycemia patient with symptoms of hypoglycemia and ability to
Contraindications:
• May be detrimental to patients experiencing cerebral ischemia and/or
hemorrhage since D50W may increase the cranial bleeding.
Precautions:
• Use extreme caution with disoriented patients so as to ensure the medication is
not aspirated into the lungs.
• One (1) tube.
• If the first dose is ineffective, a second dose may be administered after 5 – 10
Page 68 of 73
Basic EMT Skills Manual
H. Waid Ray, 17th Edition
Instructions to the Candidate: Hypoglycemia
Management (Oral Glucose)
This station is designed to test your ability to administer oral medication to correct hypoglycemia. You should assume that I am the actual patient and may ask me any questions you would normally ask a patient in this situation. You have three (3) minutes to properly administer oral glucose to the patient. Do you have any questions?
Page 69 of 73
Basic EMT Skills Manual
H. Waid Ray, 17th Edition
Hypoglycemia Management (Oral Glucose)
Possible Awarded
Take or verbalize standard precautions
Assess hypoglycemia (<60 mg/dl) by blood glucometry
Assures patient meets all three criteria for oral glucose administration: 1)altered
mental status, 2) history of diabetes, and 3) ability to swallow Obtain order from medical control
Assure suction is available and ready for use
If possible, have patient squeeze glucose into own mouth and swallow
If patient is too confused for self-administration, squeeze small quantities of
glucose between patient's gums and cheeks, massaging lightly externally
Monitor airway carefully and immediately suction patient if necessary
Reassess blood glucometry
Verbalize need to observe patient for desired effect/adverse side effects
Critical Criteria
Failed to assess blood glucose level
Failed to assure patient meets all three criteria for oral glucose
Failed to monitor airway or suction if indicated
Failed to reassess blood glucose
Any other action or inaction causing patient harm or unnecessary pain
Page 70 of 73
Basic EMT Skills Manual
H. Waid Ray, 17th Edition
Epinephrine 1:1,000
Description:
• The drug of choice for the emergency treatment of severe allergic reactions
(anaphylaxis) due to insect stings or bites, foods, drugs, and other allergens.
Actions:
• A potent catecholamine which mimics the responses of the sympathetic nervous
system and constricts blood vessels to improve blood pressure. Reduces leakage from blood vessels, relaxes smooth muscles in the bronchioles, alleviates wheezing and dyspnea and stimulates the heartbeat.
• Halts additional swelling and hives and may reduce swelling and hives to some
Indications:
• Severe, systemic allergic reactions.
• The medication must be prescribed to the patient or the EMT must obtain on-line
orders or have a standing order from medical control.
Contraindications:
• There are no contraindications to the use of epinephrine in a life-threatening
allergic reaction.
Precautions:
• Epinephrine may precipitate angina or myocardial infarction in susceptible
• Common side effects include anxiety, chest pain, palpitations, tachycardia,
headache, pallor, dizziness, nausea and vomiting.
• The adult dose is 0.3 mg of a 1:1,000 solution. An adult auto-injector contains a
• The pediatric dose is 0.15 mg of a 1:1,000 solution. A pediatric auto-injector
contains a 0.15 mg dose.
• Consider repeating the dose after 5 – 10 minutes if the patient exhibits no
significant improvement. Epinephrine acts quickly and is quickly used by the body; therefore, a repeat dosage may be necessary after 15 – 20 minutes. Medical control must be contacted prior to administering any additional doses.
• Subcutaneous Injection via an autoinjector.
Page 71 of 73
Basic EMT Skills Manual
H. Waid Ray, 17th Edition
Instructions to the Candidate: Epinephrine Autoinjector
This station is designed to test your ability to correctly assemble the equipment needed to administer subcutaneous epinephrine in the pre-hospital setting using a patient-prescribed autoinjector. This is an isolated skills test. You will be required to assemble the necessary equipment and administer the medication to a patient using an autoinjector. You may use only the equipment available in this room. You have five (5) minutes to complete this station. Do you have any questions?
Page 72 of 73
Basic EMT Skills Manual
H. Waid Ray, 17th Edition
Epinephrine Autoinjector
Possible Awarded
Take or verbalize standard precautions
Apply high flow oxygen
Assess vital signs
Obtain order to administer medication if necessary
Note: The medical director orders you administer .3 mg of 1:1,000 Epinephrine by autoinjector
Assemble supplies
Check medication for correct medication, concentration, expiration date, etc.
Remove gray cap from end of injector as indicated on side of injector
Select appropriate general injection site (thigh or shoulder)
Explain procedure to patient, including possible side effects
Select specific site
Check injector to see if it is cocked
Place black tip firmly against site as indicated on side of pen and push hard until you hear or feel injector function holding injector against site for a minimum of
ten (10) seconds Remove needle and massage area with alcohol prep WITHOUT recapping
needle after injection Dispose of contaminated needle and syringe in sharps container
Cover injection site with bandage
Critical Criteria Did not take, or verbalize, standard precautions Did not check medication Failed to use sterile technique Administered incorrect dosage Recapped or failed to properly dispose of syringe Did not reassess patient Any other action or inaction causing patient harm or unnecessary pain
Page 73 of 73
Source: http://faculty.southwest.tn.edu/wray/documents/SkillsManual.pdf
PRODUCT TECHNICAL DOSSIER TRIBULUS TERRESTRIS EXTRACT 95% SAPONINS Product Code: P20046 Raw Material Full Name: Tribulus Terrestris Extract 95% Saponins Raw Material Full Botanical/Chemical/Latin/Trade Name/Synonyms: Tribulus Terrestris L This material is Food Grade Assay (by UV): Min 95.0% Saponins Ratio of Material: Approx. 10:1 Solubility in Water: 40-50% Soluble in Water Solubility in Alcohol: The Solubility of this product in 75-80% Alcohol 80% Particle Size: 100% pass through 80 Mesh Bulk Density: 40g/ml – 60g/ml Loss on Drying: Max 5% Ash: Max 5.0%
The new england journal of medicine Alastair J.J. Wood, M.D., Editor Management of Overactive Bladder Joseph G. Ouslander, M.D. From the Division of Geriatric Medicine veractive bladder is a symptom complex that includes uri- and Gerontology, Wesley Woods Center, nary urgency with or without urge incontinence, urinary frequency (voiding


